Workflow Series: Apache Airflow

Good day to all! My release schedule is a bit all over the place, so this is either the first or second post in my Workflow Series that shows you how to get up and running with popular workflow engines. I have another post in the works using Temporal, but the topic of this post is going to be Apache Airflow.
For the purposes of this series, a “workflow” is just some chunk of application logic that needs to be run in the context of your business. It can be short lived, synchronous, and simple, or it could be some long running, asynchronous, complicated process. Either way, running workflows in a distributed context is a critical component of modern data science engineering, since that’s typically how horizontal scalability is achieved.
In most cases, workflows can be broken down into atomic chunks of work, which we’ll call “tasks”. You can think of the overall workflow like a graph, and these task represent the nodes of the graph; the edges represent dependencies. Even better, most workflows can be described as a Directed Acyclic Graph (DAG), which have special properties.
Apache Airflow is a platform created at Airbnb and now maintained by the community to programmatically author, schedule, and monitor workflows (DAGs). If you’re completely new to Airflow, take a couple hours to sit down and read through the docs. There’s lots of great tidbits and you can read them more-or-less top to bottom pretty easily. You’ll learn all the necessary core concepts of Airflow, and you’ll also discover sections in the documentation that you’ll want to reference any time you’re doing something new with Airflow. For instance, here’s the Airflow Public API, and here’s the REST API
This post is going to follow a slightly different structure than some of my others. I have a particular use case for Airflow, and I’m going to walk you through the process of spinning up an Airflow server, deploying a DAG, and triggering it from an external service via the Airflow API. Let’s get to it!!!
Deploying an Airflow Stack⌗
I’m going to spin up this Airflow service to handle workflows for most of my hobby projects. I’ll need it to be scalable, but I don’t need a full blown Kubernetes deployment. Docker Swarm is going to be the perfect tool for the job. Fortunately Airflow has a nice overview for running with Docker here and a handy docker-compose.yml you can yoink with curl -LfO 'https://airflow.apache.org/docs/apache-airflow/2.6.2/docker-compose.yaml'. Deploying with Swarm will ultimately require a few tweaks, but you can run the stack with docker compose before going full docker stack. Here’s the contents for reference:
# Licensed to the Apache Software Foundation (ASF) under one
# or more contributor license agreements.  See the NOTICE file
# distributed with this work for additional information
# regarding copyright ownership.  The ASF licenses this file
# to you under the Apache License, Version 2.0 (the
# "License"); you may not use this file except in compliance
# with the License.  You may obtain a copy of the License at
#
#   http://www.apache.org/licenses/LICENSE-2.0
#
# Unless required by applicable law or agreed to in writing,
# software distributed under the License is distributed on an
# "AS IS" BASIS, WITHOUT WARRANTIES OR CONDITIONS OF ANY
# KIND, either express or implied.  See the License for the
# specific language governing permissions and limitations
# under the License.
#

# Basic Airflow cluster configuration for CeleryExecutor with Redis and PostgreSQL.
#
# WARNING: This configuration is for local development. Do not use it in a production deployment.
#
# This configuration supports basic configuration using environment variables or an .env file
# The following variables are supported:
#
# AIRFLOW_IMAGE_NAME           - Docker image name used to run Airflow.
#                                Default: apache/airflow:2.6.2
# AIRFLOW_UID                  - User ID in Airflow containers
#                                Default: 50000
# AIRFLOW_PROJ_DIR             - Base path to which all the files will be volumed.
#                                Default: .
# Those configurations are useful mostly in case of standalone testing/running Airflow in test/try-out mode
#
# _AIRFLOW_WWW_USER_USERNAME   - Username for the administrator account (if requested).
#                                Default: airflow
# _AIRFLOW_WWW_USER_PASSWORD   - Password for the administrator account (if requested).
#                                Default: airflow
# _PIP_ADDITIONAL_REQUIREMENTS - Additional PIP requirements to add when starting all containers.
#                                Use this option ONLY for quick checks. Installing requirements at container
#                                startup is done EVERY TIME the service is started.
#                                A better way is to build a custom image or extend the official image
#                                as described in https://airflow.apache.org/docs/docker-stack/build.html.
#                                Default: ''
#
# Feel free to modify this file to suit your needs.
---
version: '3.8'
x-airflow-common:
  &airflow-common
  # In order to add custom dependencies or upgrade provider packages you can use your extended image.
  # Comment the image line, place your Dockerfile in the directory where you placed the docker-compose.yaml
  # and uncomment the "build" line below, Then run `docker-compose build` to build the images.
  image: ${AIRFLOW_IMAGE_NAME:-apache/airflow:2.6.2}
  # build: .
  environment:
    &airflow-common-env
    AIRFLOW__CORE__EXECUTOR: CeleryExecutor
    AIRFLOW__DATABASE__SQL_ALCHEMY_CONN: postgresql+psycopg2://airflow:airflow@postgres/airflow
    # For backward compatibility, with Airflow <2.3
    AIRFLOW__CORE__SQL_ALCHEMY_CONN: postgresql+psycopg2://airflow:airflow@postgres/airflow
    AIRFLOW__CELERY__RESULT_BACKEND: db+postgresql://airflow:airflow@postgres/airflow
    AIRFLOW__CELERY__BROKER_URL: redis://:@redis:6379/0
    AIRFLOW__CORE__FERNET_KEY: ''
    AIRFLOW__CORE__DAGS_ARE_PAUSED_AT_CREATION: 'true'
    AIRFLOW__CORE__LOAD_EXAMPLES: 'true'
    AIRFLOW__API__AUTH_BACKENDS: 'airflow.api.auth.backend.basic_auth,airflow.api.auth.backend.session'
    # yamllint disable rule:line-length
    # Use simple http server on scheduler for health checks
    # See https://airflow.apache.org/docs/apache-airflow/stable/administration-and-deployment/logging-monitoring/check-health.html#scheduler-health-check-server
    # yamllint enable rule:line-length
    AIRFLOW__SCHEDULER__ENABLE_HEALTH_CHECK: 'true'
    # WARNING: Use _PIP_ADDITIONAL_REQUIREMENTS option ONLY for a quick checks
    # for other purpose (development, test and especially production usage) build/extend Airflow image.
    _PIP_ADDITIONAL_REQUIREMENTS: ${_PIP_ADDITIONAL_REQUIREMENTS:-}
  volumes:
    - ${AIRFLOW_PROJ_DIR:-.}/dags:/opt/airflow/dags
    - ${AIRFLOW_PROJ_DIR:-.}/logs:/opt/airflow/logs
    - ${AIRFLOW_PROJ_DIR:-.}/config:/opt/airflow/config
    - ${AIRFLOW_PROJ_DIR:-.}/plugins:/opt/airflow/plugins
  user: "${AIRFLOW_UID:-50000}:0"
  depends_on:
    &airflow-common-depends-on
    redis:
      condition: service_healthy
    postgres:
      condition: service_healthy

services:
  postgres:
    image: postgres:13
    environment:
      POSTGRES_USER: airflow
      POSTGRES_PASSWORD: airflow
      POSTGRES_DB: airflow
    volumes:
      - postgres-db-volume:/var/lib/postgresql/data
    healthcheck:
      test: ["CMD", "pg_isready", "-U", "airflow"]
      interval: 10s
      retries: 5
      start_period: 5s
    restart: always

  redis:
    image: redis:latest
    expose:
      - 6379
    healthcheck:
      test: ["CMD", "redis-cli", "ping"]
      interval: 10s
      timeout: 30s
      retries: 50
      start_period: 30s
    restart: always

  airflow-webserver:
    <<: *airflow-common
    command: webserver
    ports:
      - "8080:8080"
    healthcheck:
      test: ["CMD", "curl", "--fail", "http://localhost:8080/health"]
      interval: 30s
      timeout: 10s
      retries: 5
      start_period: 30s
    restart: always
    depends_on:
      <<: *airflow-common-depends-on
      airflow-init:
        condition: service_completed_successfully

  airflow-scheduler:
    <<: *airflow-common
    command: scheduler
    healthcheck:
      test: ["CMD", "curl", "--fail", "http://localhost:8974/health"]
      interval: 30s
      timeout: 10s
      retries: 5
      start_period: 30s
    restart: always
    depends_on:
      <<: *airflow-common-depends-on
      airflow-init:
        condition: service_completed_successfully

  airflow-worker:
    <<: *airflow-common
    command: celery worker
    healthcheck:
      test:
        - "CMD-SHELL"
        - 'celery --app airflow.executors.celery_executor.app inspect ping -d "celery@$${HOSTNAME}"'
      interval: 30s
      timeout: 10s
      retries: 5
      start_period: 30s
    environment:
      <<: *airflow-common-env
      # Required to handle warm shutdown of the celery workers properly
      # See https://airflow.apache.org/docs/docker-stack/entrypoint.html#signal-propagation
      DUMB_INIT_SETSID: "0"
    restart: always
    depends_on:
      <<: *airflow-common-depends-on
      airflow-init:
        condition: service_completed_successfully

  airflow-triggerer:
    <<: *airflow-common
    command: triggerer
    healthcheck:
      test: ["CMD-SHELL", 'airflow jobs check --job-type TriggererJob --hostname "$${HOSTNAME}"']
      interval: 30s
      timeout: 10s
      retries: 5
      start_period: 30s
    restart: always
    depends_on:
      <<: *airflow-common-depends-on
      airflow-init:
        condition: service_completed_successfully

  airflow-init:
    <<: *airflow-common
    entrypoint: /bin/bash
    # yamllint disable rule:line-length
    command:
      - -c
      - |
        function ver() {
          printf "%04d%04d%04d%04d" $${1//./ }
        }
        airflow_version=$$(AIRFLOW__LOGGING__LOGGING_LEVEL=INFO && gosu airflow airflow version)
        airflow_version_comparable=$$(ver $${airflow_version})
        min_airflow_version=2.2.0
        min_airflow_version_comparable=$$(ver $${min_airflow_version})
        if (( airflow_version_comparable < min_airflow_version_comparable )); then
          echo
          echo -e "\033[1;31mERROR!!!: Too old Airflow version $${airflow_version}!\e[0m"
          echo "The minimum Airflow version supported: $${min_airflow_version}. Only use this or higher!"
          echo
          exit 1
        fi
        if [[ -z "${AIRFLOW_UID}" ]]; then
          echo
          echo -e "\033[1;33mWARNING!!!: AIRFLOW_UID not set!\e[0m"
          echo "If you are on Linux, you SHOULD follow the instructions below to set "
          echo "AIRFLOW_UID environment variable, otherwise files will be owned by root."
          echo "For other operating systems you can get rid of the warning with manually created .env file:"
          echo "    See: https://airflow.apache.org/docs/apache-airflow/stable/howto/docker-compose/index.html#setting-the-right-airflow-user"
          echo
        fi
        one_meg=1048576
        mem_available=$$(($$(getconf _PHYS_PAGES) * $$(getconf PAGE_SIZE) / one_meg))
        cpus_available=$$(grep -cE 'cpu[0-9]+' /proc/stat)
        disk_available=$$(df / | tail -1 | awk '{print $$4}')
        warning_resources="false"
        if (( mem_available < 4000 )) ; then
          echo
          echo -e "\033[1;33mWARNING!!!: Not enough memory available for Docker.\e[0m"
          echo "At least 4GB of memory required. You have $$(numfmt --to iec $$((mem_available * one_meg)))"
          echo
          warning_resources="true"
        fi
        if (( cpus_available < 2 )); then
          echo
          echo -e "\033[1;33mWARNING!!!: Not enough CPUS available for Docker.\e[0m"
          echo "At least 2 CPUs recommended. You have $${cpus_available}"
          echo
          warning_resources="true"
        fi
        if (( disk_available < one_meg * 10 )); then
          echo
          echo -e "\033[1;33mWARNING!!!: Not enough Disk space available for Docker.\e[0m"
          echo "At least 10 GBs recommended. You have $$(numfmt --to iec $$((disk_available * 1024 )))"
          echo
          warning_resources="true"
        fi
        if [[ $${warning_resources} == "true" ]]; then
          echo
          echo -e "\033[1;33mWARNING!!!: You have not enough resources to run Airflow (see above)!\e[0m"
          echo "Please follow the instructions to increase amount of resources available:"
          echo "   https://airflow.apache.org/docs/apache-airflow/stable/howto/docker-compose/index.html#before-you-begin"
          echo
        fi
        mkdir -p /sources/logs /sources/dags /sources/plugins
        chown -R "${AIRFLOW_UID}:0" /sources/{logs,dags,plugins}
        exec /entrypoint airflow version
    # yamllint enable rule:line-length
    environment:
      <<: *airflow-common-env
      _AIRFLOW_DB_UPGRADE: 'true'
      _AIRFLOW_WWW_USER_CREATE: 'true'
      _AIRFLOW_WWW_USER_USERNAME: ${_AIRFLOW_WWW_USER_USERNAME:-airflow}
      _AIRFLOW_WWW_USER_PASSWORD: ${_AIRFLOW_WWW_USER_PASSWORD:-airflow}
      _PIP_ADDITIONAL_REQUIREMENTS: ''
    user: "0:0"
    volumes:
      - ${AIRFLOW_PROJ_DIR:-.}:/sources

  airflow-cli:
    <<: *airflow-common
    profiles:
      - debug
    environment:
      <<: *airflow-common-env
      CONNECTION_CHECK_MAX_COUNT: "0"
    # Workaround for entrypoint issue. See: https://github.com/apache/airflow/issues/16252
    command:
      - bash
      - -c
      - airflow

  # You can enable flower by adding "--profile flower" option e.g. docker-compose --profile flower up
  # or by explicitly targeted on the command line e.g. docker-compose up flower.
  # See: https://docs.docker.com/compose/profiles/
  flower:
    <<: *airflow-common
    command: celery flower
    profiles:
      - flower
    ports:
      - "5555:5555"
    healthcheck:
      test: ["CMD", "curl", "--fail", "http://localhost:5555/"]
      interval: 30s
      timeout: 10s
      retries: 5
      start_period: 30s
    restart: always
    depends_on:
      <<: *airflow-common-depends-on
      airflow-init:
        condition: service_completed_successfully

volumes:
  postgres-db-volume:
This will set you up with a stack that uses Redis and Celery to run your workers; eventually when you’re running in swarm mode you can trivially scale your workers. Next, do mkdir -p ./dags ./logs ./plugins ./config && echo -e "AIRFLOW_UID=$(id -u)" > .env. At this point you can just docker compose up and you should be up and running (though be sure to glance at the logs to see if anything is amiss). You should be able to go to hostname:8080 and you should see the Airflow login (you can login with username airflow and password airflow). You may want to do docker compose --profile flower up to bring up Flower; you can check this out by going to hostname:5555 and you should see the Flower UI showing the status of your one worker node.
Note that you probably won’t be able to run this on your everyday laptop; Airflow wants several GB of memory, so you’ll want to run this on either a slightly-beefier-than-free-tier cloud server, or you can do what I’m currently doing and just run it on your home PC. I’ve got all my devices connected on a Tailscale network, so it’s very easy to just docker-compose up -d on my PC and let Tailscale handle all the DNS bits. If you want your containers to be able to leverage Tailscale’s MagicDNS (which you almost certainly do), then you’ll need to add something like the following to your various services blocks of your docker-compose.yml:
  dns:
    - 100.100.100.100
Side note: when you’re running Docker containers on MacOS and you want them to be able to use your Tailscale DNS, you need to do something like --dns-search tail4e3cb.ts.net since the host networking on MacOS is a bit different than on Linux. This is typically relevant when you’re doing something like running redis-cli from inside a Redis container on your laptop to connect to a Redis server on one of your Tailscale connected machines (end of tangent).
Airflow configuration is handled in airflow.cfg. However, if you’re using the docker-compose.yml approach, you can just set the relevant environment variables (envs) directly. The airflow.cfg has sections; examples include [core] and [api]. To set a particular env from docker-compose.yml, the env names follow the convention AIRFLOW__[section]__[env]. Here are some examples:
The first thing you might want to do is hide the example DAGs. In order to do that, set:
AIRFLOW__CORE__LOAD_EXAMPLES: false
If you want to interact with the Airflow API, you’ll need to add basic authentication:
AIRFLOW__API__AUTH_BACKENDS: 'airflow.api.auth.backend.basic_auth,airflow.api.auth.backend.session'
If you’re having CORS issues when making your API requests, try setting the following envs:
AIRFLOW__API__ACCESS_CONTROL_ALLOW_HEADERS: 'origin, content-type, accept'AIRFLOW__API__ACCESS_CONTROL_ALLOW_METHODS: 'POST, GET, OPTIONS, DELETE'AIRFLOW__API__ACCESS_CONTROL_ALLOW_ORIGIN: 'localhost mysite.com'
Testing the API⌗
Before you disable the examples, you’ll want to test that the API is working. We can do that by triggering a DAG. Here’s a Python snippet that will do just that (here’s the relevant API route):
import requests
from requests.auth import HTTPBasicAuth

def airflow_trigger():
    """Trigger an airflow dag over HTTP."""
    res = requests.post(
        "http://hostname:8080/api/v1/dags/tutorial_dag/dagRuns",
        headers=headers,
        auth=HTTPBasicAuth("airflow", "airflow"),
        timeout=5,
    )
    res.raise_for_status()
If your response has an error, you’ve still got some troubleshooting to do, but if not, then you’re probably good! Check out your Airflow UI and confirm that the DAG ran successfully. You may find that your DAG is stuck in a “pending” state. This is because DAGs don’t actually run if they’re “paused”. You can unpause the DAG via the UI by toggling the switch next to the DAG ID, or you can unpause via the API.
Scheduler Config⌗
Before we put on our DAG author hat, there’s some configuration variables you might be interested in. If you’re tinkering/developing new DAGs, you might want the server to refresh it’s DAG listing quickly. There’s two envs that control this behavior:
min_file_process_interval: Number of seconds after which a DAG file is parsed. The DAG file is parsed every min_file_process_interval number of seconds. Updates to DAGs are reflected after this interval. Keeping this number low will increase CPU usage. Default 30 seconds. This parameter uses the envAIRFLOW__SCHEDULER__MIN_FILE_PROCESS_INTERVAL.
In cases where there are only a small number of DAG definition files, the loop could potentially process the DAG definition files many times a minute. To control the rate of DAG file processing, the min_file_process_interval can be set to a higher value. This parameter ensures that a DAG definition file is not processed more often than once every min_file_process_interval seconds.
dag_dir_list_interval: How often (in seconds) to scan the DAGs directory for new files. Default to 5 minutes (300 seconds). This parameter uses the envAIRFLOW__SCHEDULER__DAG_DIR_LIST_INTERVAL.
Since the scheduler can run indefinitely, it’s necessary to periodically refresh the list of files in the DAG definition directory. The refresh interval is controlled with the dag_dir_list_interval configuration parameter.
Scaffolding the DAG⌗
Let’s dig into the use case I have in mind for this toy example DAG. My clients can subscribe to receive real time data about a particular resource_id that exists in some external system. The external API doesn’t offer a WebSocket stream, so I need to long-poll their REST API. I have potentially many client connections, but I can’t long-poll the API more than once per resource_id due to rate-limit constraints. In order to distribute the results to my clients, I’ll push the data from the API onto a Redis PubSub channel keyed by resource_id, and my HTTP server can distribute the messages to interested clients over WebSocket.
In summary, I want a DAG that:
- Accepts a parameter specifying the external
resource_id. - Polls the external API for
resource_id. - Pushes the result onto a Redis PubSub channel keyed under
resource_id. - No-ops if the DAG is already polling for this
resource_id. - Can be started and stopped via the REST API.
First up, the DAG accepts a resource_id as a parameter. This is easily added via the params kwarg to the DAG constructor. These params are conventionally accessed in your tasks via a **context dependency. Note that this set of kwargs correspond exactly to the context variables you can use in your Jinja templates. Here’s an example:
import time
import logging

from airflow.decorators import dag, task
from airflow.models.param import Param

@dag(
    schedule=None,
    start_date=None,
    catchup=False,
    params={
        "resource_id": Param("foo", "A resource_id to monitor.")
    }
)
def my_dag():
    """This DAG does something."""
    logger = logging.getLogger("airflow.task")

    @task()
    def poll_task(**context):
        """Query an external API for data about resource_id."""
        rid = context["params"]["resource_id"]
        logger.info("Querying external API for resource_id: %s", rid)
        return {rid: f"some query result {time.time()}"}

    poll_task()
my_dag()
I’m skipping over the implementation details of poll_task for now. If you’re hitting an external API, there’s a variety of approaches you might take. Since this is so context dependent, let’s just keep it simple and assume this task returns some JSON serializable value. In the future, I’ll likely do a blog post about writing your own Connections and Hooks, in which case I’ll link that post here.
Triggering the DAG⌗
Airflow has a pretty comprehensive REST API, which makes it easy to programmatically interact with your workflows. You can trigger the DAG externally with the following API call:
import requests
from requests.auth import HTTPBasicAuth

def airflow_trigger():
    """Trigger an airflow dag over HTTP."""
    resource_id = "abc123"
    res = requests.post(
        "http://hostname:8080/api/v1/dags/my_dag/dagRuns",
        headers=headers,
        auth=HTTPBasicAuth("airflow", "airflow"),
        data={"params": {"resource_id": resource_id}}
        timeout=5,
    )
    res.raise_for_status()
Publishing to Redis⌗
Next we need to be able to publish the data received from the external query to Redis. Fortunately Airflow has a Redis provider that exposes some of the PubSub interface. Note that you’ll need to have a Redis server running and it will need to be accessible from your Airflow worker containers. You’ll also need to add the connection details under Admin > Connections via the UI. For the purposes of this demo, my connection is called airflow-redis. Once that’s done, you should be able to use the Airflow-provided RedisPublishOperator. Note that we’re using xcom_pull to pull data returned from another task. You can do this in both templating or via the **context dict. For more details, check out the XComs documentation. Here’s what a DAG that publishes to a Redis channel might look like:
import logging

from airflow.decorators import dag, task
from airflow.models.param import Param
from airflow.providers.redis.operators.redis_publish import RedisPublishOperator

@dag(
    schedule=None,
    start_date=None,
    catchup=False,
    params={
        "resource_id": Param("foo", "A resource_id to monitor.")
    }
)
def my_dag():
    """This DAG does publishes to a Redis PubSub channel."""
    logger = logging.getLogger("airflow.task")

    @task(task_id="poll_task")
    def poll_task(**context):
        """Query an external API for data about resource_id."""
        rid = context["params"]["resource_id"]
        logger.info("Querying external API for resource_id: %s", rid)
        return {rid: f"some query result {time.time()}"}
    poll_task_res = poll_task()

    publish_task_res = RedisPublishOperator(
        task_id="publish_task",
        redis_conn_id="airflow_redis",
        channel="{{ params['resource_id'] }}",
        message="{{ ti.xcom_pull(task_ids='poll_task') }}",
    )

    poll_task_res >> publish_task_res
my_dag()
Ok, now back to the tricky bit. We need implement some branching logic and determine if there’s any active subscribers on the channel. If there’s nobody listening, then the DAG should exit; otherwise it should perform another poll/publish loop. Conveniently, the return value of the Redis PUBLISH command is the number of subscribers the message was delivered to. This is extra neat because we can be confident that when we unsub (or inadvertently drop) a subscriber on our server, Redis will handle all the nitty-gritty subscriber intricacies for us. Unfortunately, the existing Airflow provider doesn’t actually return this value. However, it’s easy to write your own custom provider that returns the value.
Implementing Custom Operators⌗
If you’re following with the approach in the deployment section, it’s quite easy to add your own operators. You can simply create an operators.py in the plugins directory and it’ll be automatically picked up by Airflow. Alternatively, you can add your own module and futz with PYTHONPATH, but that’s up to you. The Airflow documentation even suggests doing this; for an enterprise scale deployment you probably wouldn’t want to do this, but in principle there’s nothing wrong with it. Then, in your DAG file, you can import like so:
from plugins.operators import RedisPublishReturnOperator
Now all you have to do is copy/paste the implementation of RedisPublishOperator into operators.py, update the class name to RedisPublishReturnOperator and update the execute method to return the value instead of simply logging it.
Self-Triggering the DAG⌗
You might think that the DAG should operate like a while loop, automatically rerunning certain tasks depending on some condition. This doesn’t really jive with the Acyclic part of DAG, but we can do something similar pretty easily.
First we’ll implement a task that will (re)trigger the DAG itself. Then we can use a branching task that will execute that task (or not) based on the return value of the PUBLISH task. We also want to add a “sleep” task that will keep our polling within the rate limits imposed by the external API.
In most circumstances, you’d probably use TriggerDagRunOperator. However, there’s a bit of a gotcha here. We need to pass the params from the DAG itself into the triggered DAG. There’s not a trivial way to do this as far as I can tell. Naively, conf={{ params }} should do the trick, but this will raise some JSON related exception due to how params is serialized. See this blog post for some more details/screenshots. I wasn’t really satisfied with the approach taken by the author of the blog above, so I did something a bit different. Instead of using TriggerDagRunOperator, you can write your own @task that will (re)trigger the current DAG by calling trigger_dag directly. It’s trivial to access the params via the **context dependency and pass that to trigger_dag.
Finally, we need to add a bit of branching logic. I recommending reading the docs on branching, but in short, you can use @task.branch to wrap a function that returns a task_id (or list of task_ids) that should run based on certain conditions.
Here’s what our DAG looks like after adding in these two bits:
import logging

from airflow.decorators import dag, task
from airflow.utils import timezone
from airflow.utils.types import DagRunType
from airflow.api.common.trigger_dag import trigger_dag
from airflow.models import DagRun
from airflow.models.param import Param

from plugins.operators import RedisPublishOperator

@dag(
    schedule=None,
    start_date=None,
    catchup=False,
    params={
        "resource_id": Param("foo", "A resource_id to monitor.")
    }
)
def my_dag():
    """This DAG does publishes to a Redis PubSub channel."""
    logger = logging.getLogger("airflow.task")

    @task(task_id="poll_task")
    def poll_task(**context):
        """Query an external API for data about resource_id."""
        rid = context["params"]["resource_id"]
        logger.info("Querying external API for resource_id: %s", rid)
        return {rid: f"some query result {time.time()}"}
    poll_task_res = poll_task()

    publish_task_res = RedisPublishOperator(
        task_id="publish_task",
        redis_conn_id="airflow_redis",
        channel="{{ params['resource_id'] }}",
        message="{{ ti.xcom_pull(task_ids='poll_task') }}",
    )

    @task()
    def trigger_self(**context):
        """Rerun the current DAG."""
        parsed_execution_date = timezone.utcnow()
        trigger_dag(
            dag_id=context["dag"].dag_id,
            run_id=DagRun.generate_run_id(DagRunType.MANUAL, parsed_execution_date),
            conf=context["params"],
            execution_date=parsed_execution_date,
            replace_microseconds=False,
        )
    trigger_self_res = trigger_self()

    # sleep to prevent spamming
    @task(task_id="sleep")
    def sleep():
        """Sleep."""
        time.sleep(3)
        return
    sleep_res = sleep()

    @task.branch(task_id="branch_task")
    def branching(**context):
        """Rerun if subscribers are present."""
        task_instance = context["task_instance"]
        sub_count = task_instance.xcom_pull(task_ids="publish_task")
        if sub_count > 0:
            return "sleep"
    branching_res = branching()

    poll_task_res >> publish_task_res >> branching_res >> sleep_res >> self_trigger_res
my_dag()
Debouncing Simultaneous DAG Runs⌗
For my final trick, I want to prevent multiple clients from initiating DAG runs for the same resource_id. We’ll use Redis to implement a lock for each resource_id. The key will be something like f"lock:{resource_id}, and the value will be something like f"{dag_id} {run_id}. Airflow itself enforces uniqueness on (dag_id, run_id), so it’s safe to assume at most one lock owner (process) exists for any (dag_id, run_id). The DAG will attempt to acquire the lock for the supplied resource_id. If it doesn’t get the lock, the DAG will simply exit. If the DAG gets the lock, then it will continue as normal, but must also release the lock before triggering the subsequent DAG run.
The obvious downside of this approach is that every client request is going to initiate a DAG run. This could be expensive even if most runs immediately fail to acquire the lock and short circuit. However, since the lock is stored in Redis under the f"lock:{resource_id}" key, we can have our HTTP server short circuit this process as well.
We’re going to need a custom operator for managing the lock. Under the hood, we can use the Redis SET command with nx=True to set a key if it doesn’t already exist. Then, we’ll get the key and check the value. If it equals the DAG’s (dag_id, run_id), then we’ve got the lock, and if not, then someone else has the lock and we should just exit. We also want this operator to be able to release the lock as well. Here’s what that operator looks like:
class RedisLockOperator(BaseOperator):
    """
    Attempt to acquire/release a Redis lock.

    :param lock_key: redis key for the lock (templated)
    :param lock_value: the value for the lock (templated)
    :param release: if True, release the lock
    :param redis_conn_id: redis connection to use
    """

    template_fields: Sequence[str] = ("lock_key", "lock_value")

    def __init__(
        self,
        *,
        lock_key: str,
        lock_value: str = "",
        release: bool = False,
        redis_conn_id: str = "redis_default",
        **kwargs
    ) -> None:
        super().__init__(**kwargs)
        self.redis_conn_id = redis_conn_id
        self.lock_key = lock_key
        self.lock_value = lock_value
        self.release = release

    def execute(self, context: Context) -> None:
        """Modify a Redis lock.

        If self.lock_value equals the the value stored under self.lock_key in
        Redis, then the instance is considered to hold the lock. If `release` is
        truthy and the instance owns the lock, then the lock will be released.

        If `release` is falsey, then this will attempt to acquire the lock by
        setting the value self.lock_key to self.lock_value in Redis. Finally,
        the value under self.lock_key in Redis is checked; if it equals
        self.lock_value, then this returns True to indicate we hold the lock.

        :param context: the context object
        """
        redis_hook = RedisHook(redis_conn_id=self.redis_conn_id)
        rdb = redis_hook.get_conn()

        if self.release:
            # verify we _actually_ have the lock before releasing it
            result = rdb.get(self.lock_key)
            if result and str(result) == self.lock_value:
                self.log.info("%s released lock %s", self.lock_value, self.lock_key)
                return rdb.delete(self.lock_key)
            else:
                self.log.info(
                    "%s wants to release lock %s, but %s holds it. Doing nothing.",
                    self.lock_value, self.lock_key, result)
                return

        result = rdb.set(self.lock_key, self.lock_value, nx=True)
        self.log.info("Redis SET NX result %s", result)
        # It's possible the lock was already held by lock_key, in which case the
        # SET NX would return falsey, but we'd actually have the lock, so verify
        # by checking the value and then returning if the value matches
        # lock_value.
        result = rdb.get(self.lock_key)
        self.log.info("Redis GET result %s", result)
        if result and str(result) == self.lock_value:
            return True
Now with our new operator, we can update our DAG to include the additional (un)locking nodes. As a reminder, we want to try to acquire the lock right at the start of the DAG and exit early if the lock is already held. On the other hand, if we get the lock, we need to release it after all upstream dependencies are done. We can do this using trigger_rule=TriggerRules.ALL_DONE. Keep in mind, however, that if your branching logic or short circuit operators don’t include the “unlock” task, then the unlock task will never run. There’s some gotchas surrounding this behavior so make sure this is well tested (I’ll talk about testing DAGs in a future post).
Since the dependency chain was getting a little difficult to read, I switched to using the chain helper and made a couple other tweaks. Here’s what our DAG looks like now (this is the final version):
import logging

from airflow.decorators import dag, task
from airflow.utils import timezone
from airflow.utils.trigger_rule import TriggerRule
from airflow.utils.types import DagRunType
from airflow.api.common.trigger_dag import trigger_dag
from airflow.models import DagRun
from airflow.models.baseoperator import chain
from airflow.models.param import Param

from plugins.operators import (
    RedisPublishOperator,
    RedisLockOperator,
)

@dag(
    schedule=None,
    start_date=None,
    catchup=False,
    params={
        "resource_id": Param("foo", "A resource_id to monitor.")
    }
)
def my_dag():
    """This DAG does publishes to a Redis PubSub channel."""
    logger = logging.getLogger("airflow.task")

    acquire_lock_res = RedisLockOperator(
        task_id="acquire_lock_task",
        redis_conn_id="airflow_redis",
        lock_key="poll-lock:{{ params['resource_id'] }}",
        lock_value="({{ dag.dag_id }}, {{ run_id }})",
    )

    release_lock_res = RedisLockOperator(
        task_id="release_lock_task",
        redis_conn_id="airflow_redis",
        lock_key="poll-lock:{{ params['resource_id'] }}",
        lock_value="({{ dag.dag_id }}, {{ run_id }})",
        release=True,
        trigger_rule=TriggerRule.ALL_DONE,
    )

    @task(task_id="poll_task")
    def poll_task(**context):
        """Query an external API for data about resource_id."""
        rid = context["params"]["resource_id"]
        logger.info("Querying external API for resource_id: %s", rid)
        return {rid: f"some query result {time.time()}"}
    poll_task_res = poll_task()

    publish_task_res = RedisPublishOperator(
        task_id="publish_task",
        redis_conn_id="airflow_redis",
        channel="{{ params['resource_id'] }}",
        message="{{ ti.xcom_pull(task_ids='poll_task') }}",
    )

    @task()
    def trigger_self(**context):
        """Rerun the current DAG."""
        parsed_execution_date = timezone.utcnow()
        trigger_dag(
            dag_id=context["dag"].dag_id,
            run_id=DagRun.generate_run_id(DagRunType.MANUAL, parsed_execution_date),
            conf=context["params"],
            execution_date=parsed_execution_date,
            replace_microseconds=False,
        )
    trigger_self_res = trigger_self()

    @task(task_id="sleep")
    def sleep():
        """Sleep."""
        time.sleep(3)
        return
    sleep_res = sleep()

    @task.branch(task_id="branch_task")
    def branching(**context):
        """Rerun if subscribers are present."""
        task_instance = context["task_instance"]
        sub_count = task_instance.xcom_pull(task_ids="publish_task")
        if sub_count < 1:
            return "release_lock_task"
        return "sleep"
    branching_res = branching()

    # main DAG dependency flow
    chain(
        acquire_lock_res,
        lock_branch_res,
        poll_task_res,
        publish_task_res,
        sub_count_branch_res,
        release_lock_res,
        trigger_self_res,
    )
    # block retriggering on sleep succeeding
    trigger_self_res.set_upstream(sleep_res)

my_dag()
Deploying the DAG⌗
Deploying the DAG is almost trivial. You just copy it to the /dags folder you created when setting up your Airflow server. You should see your DAG get picked up (or updated); how promptly depends on how you have your scheduler configured. See the Scheduler Config section above if your updates aren’t getting picked up quickly enough for your liking. Here’s what the DAG above looks like in the Airflow UI:

Seeing it in Action⌗
In one terminal, I’m going to start a process that listens on a Redis PubSub channel and prints the incoming data to the console. Here’s what that looks like:
def subscribe_pubsub(topic):
    """Print incoming messages from PubSub."""
    rdb = get_redis_client()
    ps = rdb.pubsub()
    ps.subscribe(topic)
    for item in ps.listen():
        print(item)
In another terminal, I’m going to be triggering my DAG with an HTTP request using something like the snippet shown above. The DAG is going to publish some data on the Redis channel, and you should see that data in the terminal you’re listening on. That’s pretty neat! But there’s two more features to keep in mind:
- Subsequent calls to trigger this DAG while it’s running should result in a no-op. As discussed above, this won’t be a total no-op since the DAG run still gets triggered, but that run should fail to acquire the lock and skip the rest of the workflow.
- The DAG should only re-trigger when there’s one or more subscribers. You should see the DAG continually spawning subsequent DAG runs (you can see this dynamically in the Airflow UI if you have auto-refresh enabled). However, once you kill the process running your PubSub subscription, you should see the DAG short circuit and skip the sleep/self-triggering branch.
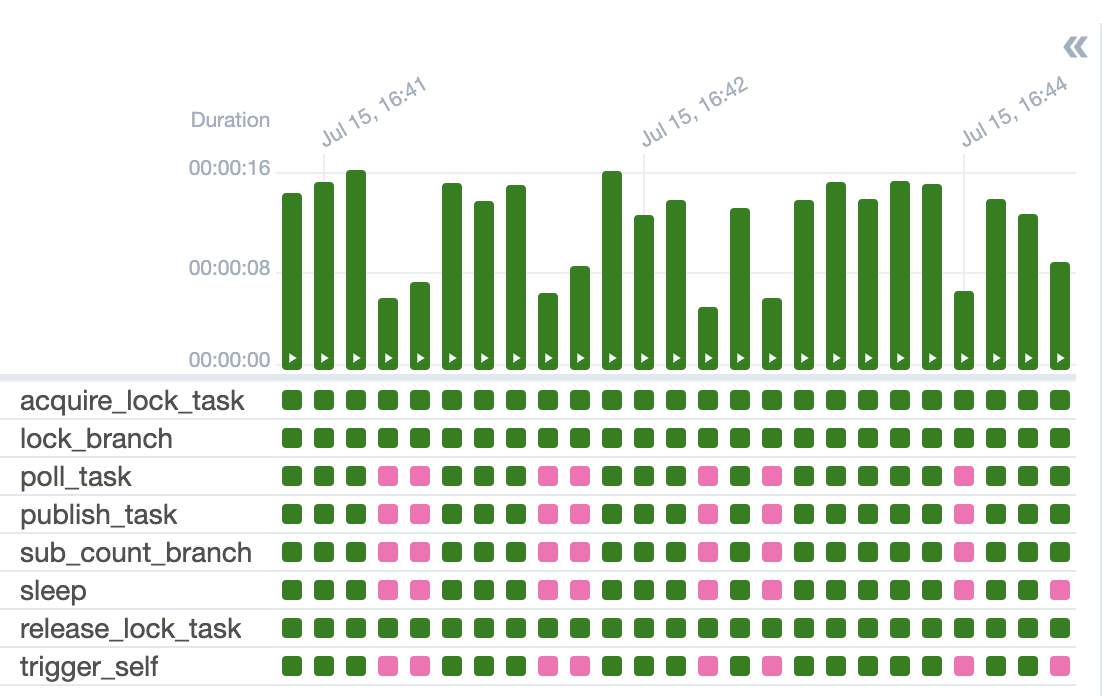
The best way to confirm this is all working is to check out the Airflow UI. You can manually trigger the DAG and manually subscribe to the relevant Redis channel, and you should see the DAG continuously running. You can also spam some additional trigger requests in there now and then and you should see those DAG runs start and then skip the bulk of the workflow. You can also click on tasks and inspect the logs to see the informative logging messages. Finally, you can kill your Redis subscription and you should see the branching logic short circuit and prevent additional DAG runs from being triggered. Here’s what the grid view looks like:
Holy smokes, that was a lot to cover!!! But in the grand scheme of things, it wasn’t too bad and was all pretty navigable once you know where the relevant documentation lives. Hopefully this whets your appetite for authoring some DAGs. Keep an eye out for some related posts; eventually I’d like to go over testing your DAGs and scaling your Airflow service. Right now, however, I want to get back to the project that inspired this post: Reddit As A Backend - Bayesian Views of Opinionated Polls. Until next time!